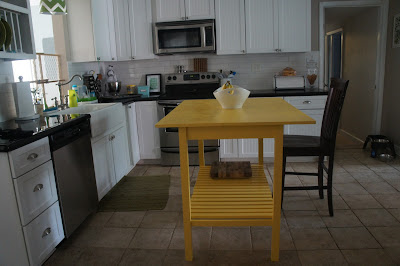
That's right folks...we officially have a kitchen island/breakfast bar. But let's rewind a bit here and explain how we got here. I'm sure you all have heard of Ana White, and if not, you have now and you should because the girl is pretty much a DIY genius. She comes up with simple plans for building all kinds of furniture. Of course, the plans are only simple if you happen to have a knack for building and all, which I don't (or at least didn't...maybe I'm starting to develop one though). Luckily, my sister's boyfriend does, though, and when I mentioned that I had found some plans for a kitchen island, he generously offered to
The boys and I headed to the Home Depot prior to his arrival to collect all the supplies. Not only does Ana White provide the directions, but she also includes a detailed shopping list and cut list for the project. (Here's a link to the guide we used in case you want to see it). Even with that, I was a little nervous that I was going to totally mess up getting the wood, BUT then I met the nicest man ever, Brian, a Home Depot merchant, who literally took my link, read through it, and walked through the store collecting my supplies. Seriously, I just followed behind as he picked everything out, directed the guy on how to cut it (just enough to get in my car, not all the way since I would be making mine larger than the one in the directions and wasn't sure what the cuts would need to be), and even walked out to the car with me to load it in!!! I was completely in shock and totally grateful (and still am) at how nice that guy was to help me out. So, about an hour later (not the 6+ it probably would have taken me to do it alone), the boys and I headed home and unloaded the wood.
Saturday morning came around, and Jimmy (sister's boyfriend) showed up right on time to begin assembly. I learned a lot about woodbuilding during this process. The first thing is that you can know how to use the tools all you want, but the most important part is figuring out exactly what dimensions everything needs to be. The original island was 2 foot by 4 foot, but I wanted mine to be a bit bigger at 3 foot by 4 foot, with some overhang to allow us to pull up some stools. I've already linked to the original plan, but I'll include the dimensions for our version just in case you're interested in building one the same size as mine. Jimmy quickly did the math, and figured out that we needed to make cuts at 40.5 (length) and 20.5 (width), so I measured and he cut and then we repeated that process for the bottom pieces.
 |
| we did have a pretty cute measuring helper |
With the cuts made, he brought out the Kreg Jig (possibly the coolest thing ever), and we prepared all the screw holes. I've learned with all my other DIY projects that the prep work is often the most tedious...both in terms of being the most time-consuming and labor-intensive, and the same could be said for this project.
Once everything was measured and cut, building it was actually a breeze. We didn't really follow Ana's plan, but I think we did it the same way. We started off by building the sides.
And then attached the sides together to make the frame.
Once the frame was secure, we attached the smaller pieces at the bottom that would eventually serve as the shelf.
After much thought, I decided to go with yellow (Egg Yolk by Martha Stewart) for the island's color. Over the next two days, I painted all the parts of my new island...a first coat, a second coat, even a third coat in some places...and then applied a couple of layers of poly. And finally, we put the whole thing back together (we had taken the top off to replace it with another, thicker version) to arrive at our final product!
But here's where I need your help. I knew the yellow was a bit of a risk, but I kind of
wanted to add a little shot of color to our black and white kitchen. I figured I could always tone it down some if necessary, so here's the question...is it necessary? Here's a few different angles to give you more info (oh and the chair is a loaner from our dining room set...we'll be getting something else if and when I find it!):
So, let's vote shall we: leave it yellow, paint the top white, or paint the top black. Those are the options I'm playing with but, of course, feel free to suggest something else!!! Seriously, I'd just love to hear from you all...


No comments:
Post a Comment
Make my day...leave a comment